
Demystifying the File Structure of React Native CLI: A Beginner's Guide
~By Akash Srinivasan


🤔Understanding the File Structure of React Native CLI
Are you new to React Native CLI? Are you struggling to understand the file structure of your React Native project? Fear not, for in this blog post, we will explore the basics of the file structure in React Native CLI, and explain how each file and folder is used to build your app.
But before we dive in, let's start with a joke and a meme to lighten up the mood:

Now that we've had our laugh, let's get down to business.
When you create a new React Native project using the CLI, you will see a folder structure that looks something like this:
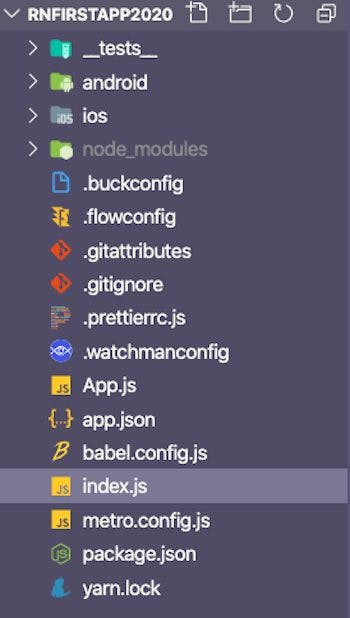
Let's break down each folder and file:
1) 🐞 TESTS Folder
There is always a place for testing so this folder has all the tests that our apps should/must pass to be approved for deployment but not in the case of learning or individual development ✌.
2) 🗃 .Bundle Folder
The reason for pre-building this bundle is to improve the performance of your app. In development mode, React Native will compile your JavaScript code on-the-fly, which can slow down your app's startup time. By pre-building the bundle, your app can load much faster and provide a better user experience.
It's worth noting that you don't need to manually manage the .bundle folder in your React Native project, as it is automatically created and updated by the React Native CLI. However, if you ever need to manually delete the .bundle folder, make sure to rebuild your app's bundle afterwards to ensure that your app is running with the latest code.
In summary, the .bundle folder in React Native CLI is used to store pre-built JavaScript files that improve the performance of your app in production mode.
3) 🗃 Node Modules
This folder contains all the dependencies that your project requires. You don't need to worry about this folder too much, as it is automatically created when you install packages for your project.
4) 📁 Android Folder
This folder contains all the files related to building your app for the Android platform. If you plan on building your app for Android, this is where you will make changes to the app. The android folder contains all the files related to building your app for the Android platform. If you plan on building your app for Android, this is where you will make changes to the app. Inside the android folder, you'll find files such as build.gradle, which is used to configure the build process for your app, and AndroidManifest.xml, which contains information about your app, such as its name, icon, and permissions.
5) 📁 IOS Folder
This folder contains all the files related to building your app for the iOS platform. If you plan on building your app for iOS, this is where you will make changes to the app. The ios folder contains all the files related to building your app for the iOS platform. If you plan on building your app for iOS, this is where you will make changes to the app. Inside the ios folder, you'll find files such as Info.plist, which contains information about your app, such as its name, icon, and version number, and AppDelegate.m, which is the entry point for your app on iOS.
6) 📑 App.js File
This is the main file of your React Native app, and where you will write most of your code. It is essentially the entry point of your app, and is where you can import and use other components and files.
7) 📜 Package.json File
This file contains all the information about your project, including the name, version, dependencies, and scripts. You can use this file to install and manage dependencies, as well as configure your project.
8) 📑 Index.js File
This file is used to register the app, and is where you will find the AppRegistry component. This is the component that tells React Native which component to render for your app.
Configs & Settings Files
9) ⚙️ Babel.config.js File
In React Native CLI, the babel.config.js file is used to configure the Babel compiler, which is responsible for transpiling your JavaScript code so that it can be run in different environments.
Babel is used to transforming newer JavaScript features, such as arrow functions and template literals, into older syntax that can be understood by older browsers and environments. It can also be used to transform JSX syntax into regular JavaScript.
10) ⚙️ Metro.config.js File
This file is used to configure Metro, the JavaScript bundler used by React Native. You can use this file to customize how your code is bundled and optimized for production.
11) ⚙️ tsconfig.js File
In React Native CLI, the tsconfig.json file is used to configure the TypeScript compiler and define how TypeScript files should be compiled in your project.
TypeScript is a superset of JavaScript that adds static type checking and other features to the language. By using TypeScript, you can catch type-related errors at compile time, which can help you write more robust and maintainable code.
When you create a new React Native project with TypeScript support using the React Native CLI, it will generate a tsconfig.json file in the root of your project. This file contains a set of compiler options that determine how TypeScript files in your project should be compiled.
By configuring tsconfig.json to your project's needs, you can ensure that your TypeScript files are compiled correctly and that your app runs smoothly. In summary, the tsconfig.json file in React Native CLI is used to configure the TypeScript compiler and define how TypeScript files should be compiled in your project. It is an essential file for building TypeScript-based React Native apps.
12) ⚙️ Watchman.config.js
In React Native CLI, the watchman.config file is used to configuring Watchman, a file-watching service used by React Native's development server. It is a JSON file that contains configuration options for Watchman. It can be used to specify the folders and files to watch for changes. You can also use watchman.config to set up ignore rules for files and folders. This file is useful for optimizing the performance of the development server, especially in large projects. watchman.config is an optional file, and if it is not present in your project, React Native's default configuration for Watchman will be used.
Default Tools from React Native
13) 🛠 .eslintrc.js
In React Native CLI, the .eslintrc.js file is used to configure the ESLint tool, which is a popular linter for JavaScript code. A linter is a tool that analyzes your code for errors and style violations, helping you write code that is more consistent and maintainable.
The .eslintrc.js file contains a set of rules that determine how ESLint should analyze your code. Some of the things you can configure with ESLint rules include:
Code style conventions: ESLint can enforce a set of coding style guidelines, such as requiring or disallowing specific formatting choices.
Best practices: ESLint can warn you about potentially problematic code patterns, such as unused variables or implicit type coercion.
Code quality: ESLint can check for code that may be confusing or difficult to read, such as ambiguous variable names or nested control structures.
14) 🛠 .prettierrc.js
In React Native CLI, the .prettierrc.js file is used to configure the Prettier code formatter for your project.
Prettier is a tool that automatically formats your code to follow a consistent style, which can help make your code more readable and maintainable. The .prettierrc.js file allows you to define specific formatting rules for your project, such as indentation, line width, and other style preferences.
When you save a file in your project, Prettier will automatically format the code according to the rules defined in the .prettierrc.js file. This can save you time and help you maintain a consistent code style across your project.
15) 🗃 Gem File
In React Native CLI, the Gemfile is a file used to manage Ruby dependencies in your project. It specifies the Ruby version and any gems (Ruby libraries) that your project needs to run.
Gems are packages of Ruby code that can be installed using a package manager called Bundler. The Gemfile lists the gems needed for your project, and Bundler uses this information to install and manage the gems.
While React Native itself is written in JavaScript, some third-party tools used in React Native development may be written in Ruby, which is why the Gemfile can be useful. For example, if you're using Fastlane for automating your app's release process, you may need to install some Ruby gems using Bundler.
🔚 Conclusion
And that's it! By understanding the file structure of React Native CLI, you can better navigate your project, make changes to your app, and build amazing mobile experiences.
So there you have it, a brief guide to the file structure of React Native CLI, complete with a joke and a meme to make you smile. Happy coding!